Trying to get a printout but the Brother printer won’t print? You are not alone, we all have been there. Sometimes, when we try to print our Brother printer won’t work. Such an issue can occur due to various reasons and the solution of the problem also depends on it. Before you jump to any conclusion and try to troubleshoot your printer, you should try to find out what’s causing this printer problem. Given below we have provided solutions for troubleshooting Brother printer that won’t print according to different scenarios.
Brother Printer Won’t Print Due to Offline Issue
If your Brother printer is not printing or showing Offline, then follow the steps below to bring it back in the working state.
- On your Windows PC, go to Start and open Settings.
- Select Devices and then click on Printers and Scanners.
- Choose your Brother printer model and then right-click on it.
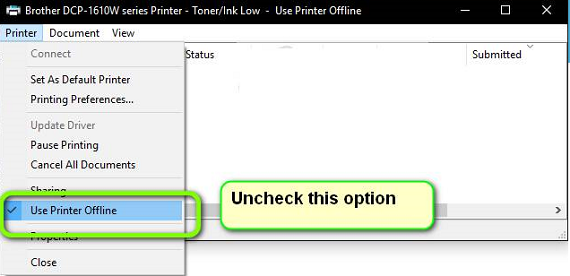
- Select the “See What’s Printing” option and then click on “Printer”.
- From the dropdown menu, uncheck the “Use printer offline” option if it is enabled.
This way you can bring your Brother printer back online if it was set to Offline. In case this doesn’t work we suggest you check your printer connections with the PC and network. Also, make sure that it is switched on.
Fix Brother Printer Won’t Print Problem by Correcting Port Settings
Your Brother printer might not work in case the Port settings are not correct. To make sure if your Brother printer is connected to the right port or to correct it, follow the steps below:
- Click on Start and open Settings.
- Select Devices and then click on Printer & Scanners.
- Now choose Devices and Printers.
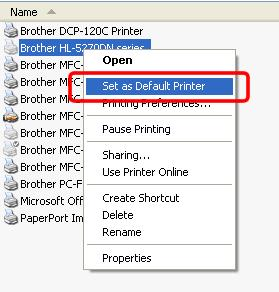
- Navigate to your printer option and right-click on it.
- Click on Properties from the menu then click on Change Properties.
- Click on Ports and select the port with your Printer name.
- Hit the Apply button to save the new settings.
Brother Printer Won’t Print But Showing Ready Status
If your Brother printer is in the ready state but still not printing, then follow the steps below:
- Such an issue can occur due to too many printing requests. To do so, go to Devices and Printers and hover your cursor over your Printer name.
- If there are any tasks pending in the queue, then you should cancel them. Just right-click on your Brother printer and select Cancel all the tasks.
- Also, check if the status of your printer is not set saying Offline. In that case, you need to right-click on your printer icon and deselect the “Use Printer Offline” option.
Try printing something from your Brother printer to check if your printer issue is resolved or not.
Reinstall Your Brother Printer
If after trying all the above solutions, your Brother printer won’t print, it can be an issue with printer installation. Given below we have mentioned how you can remove and reinstall your Brother printer easily.
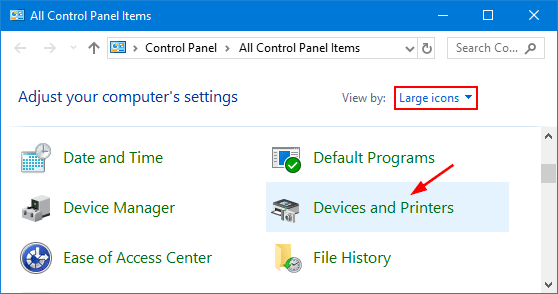
- Search for “Control Panel” on Windows search and open it.
- Go to Devices and then Printers & Scanners.
- Now you need to select your Brother Printer.
- Select Remove Device and Continue with the steps to reinstall your printer.
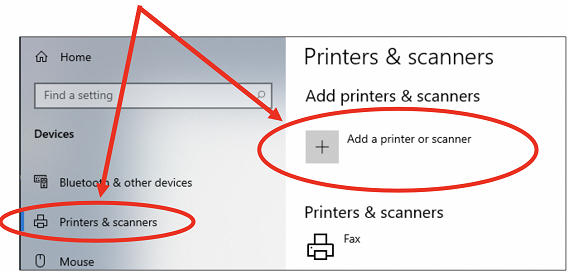
- Open Settings and then go to Printers and Scanners.
- Click on the “Add a printer or scanner” option and then wait for your computer to search for your Brother printer.
- When you see your Brother printer listed on your screen, click on it and select Add device.
Brother Printer Won’t Print – MAC Device
Brother printer stop working on Mac sometimes due to issues with drivers. The issue can be fixed easily by installing correct and updated Brother printer drivers. If your Brother printer is not printing from Mac, then you should follow the steps below to install the latest and compatible printer drivers.
- Visit the Brother Printer Support website and enter your printer model in the given space.
- Click on Search to fetch the latest printer drivers for your Mac.
- Download the printer drivers on your Mac device.
- Once the setup file is downloaded, install it and continue with the instructions on your screen to finish the setup.
- After the installation is finished, go to the Apple menu and select System Preferences.
- Now select the Printer and Scanners option and then click on the plus (+) sign.
- Click on your Brother printer name/model and select Add.
- You have installed the latest Brother printer drivers on your device successfully.
Related Article – How to Connect Brother Printer to Wi-Fi?
Now that you installed the latest driver, you can try printing a document to see if your issue is resolved or not. Your Brother printer won’t print problem should be fixed by now. However, if it does persist, feel free to contact Printer Support experts for remote assistance.