Canon MG2522 is an amazing device that allows users to print, scan and copy documents. If you want to print documents using a Canon printer you need to complete the Canon Pixmamg2522 setup first for your device. The printer setup is quite an easy process, and you can perform it on your own by following the simple instructions mentioned below. So, let’s move next and find the easy guidelines to complete the Canon MG2522 setup for your device.
How to connect a canon printer to Wi-Fi?
To connect the Canon printer to Wi-Fi, follow the guidelines mentioned below:
- Turn on your printer and Wi-Fi router.
- Hit the “WiFi” button on your Canon device and hold it until you see the blue light flashing.
- Hit the ” black” button. Look for the WPS connection.
- While looking for the WPS connection, the blue light will begin to flash. And, once you have found the connection, the blue-white will become stable.
- Now, you can connect the printer to the Wi-Fi and start printing the documents.
So, this is how you can complete the Canon Pixma MG2522 setup using the Wi-Fi connection.
Canon mg2522 wireless setup: for Windows
To set up your All-in-One inkjet Canon mg2522 printer on Windows operating system, proceed with the step-by-step instructions mentioned below:
- First of all, turn on the Canon printer, computer, and wireless router.
- In the next step, connect your printer to the Wi-Fi.
- For the Canon Pixma mg2522 setup, you need to make sure that your printer and computer are connected to the same Wi-Fi network.
- After this, you can proceed next and download the appropriate drivers and software on your device.
- To download the latest version of printer drivers in software you can visit the canon.com/ijsetup mg252 website
- On the website, you need to select the appropriate printer model you are using.
- After that, click the “download” button. Once you hit the button, the downloading process will begin.
- Proceed with the onscreen instructions and complete the installation process carefully.
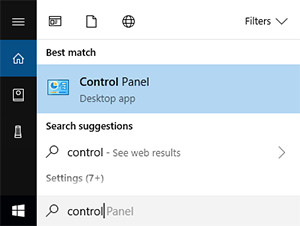
- After this, go to the start menu, and click to open the control panel.
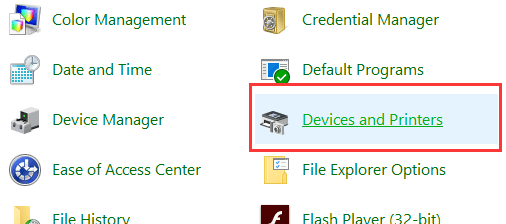
- From here, choose the ” devices and printers” option.
- Click the “Add a printer” option.
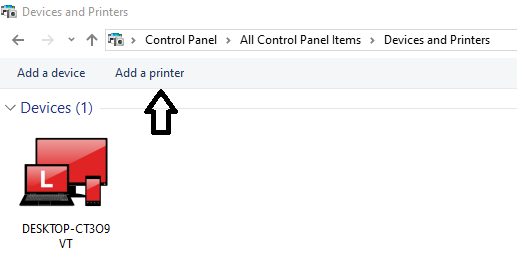
- After this, you can see a list of printers appearing. Choose your device and wait for a few seconds.
- Now your printer will be shown in a ” devices and printers” list.
So, these are some simple steps that can help you with Pixma mg2522 connect to WiFi process on your Windows computer. Now, you can start using the canon printer to print the documents wirelessly.
Canon MG2522 wireless setup: For Mac
For the Canon mg2522 wireless setup on a Mac device, follow the step-by-step instructions mentioned below:
- Turn on your printer, Wi-Fi router, and computer.
- You need to check and make sure that your printer and computer are connected to the same Wi-Fi network.
- After this, connect your Canon printer to the Wi-Fi network.
- Visit the Canon Pixma mg2522 setup website to download the appropriate drivers and software for your device.
- Once downloaded, proceed with the onscreen guidelines and complete the installation process.
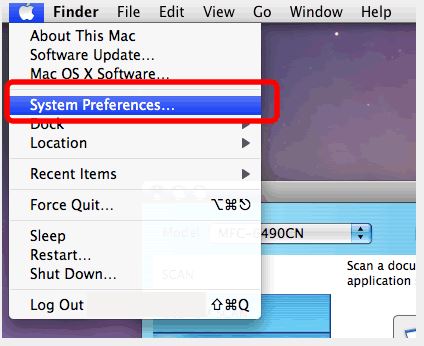
- After this, go to the “Apple” menu.
- From here, choose the “System preferences” option.
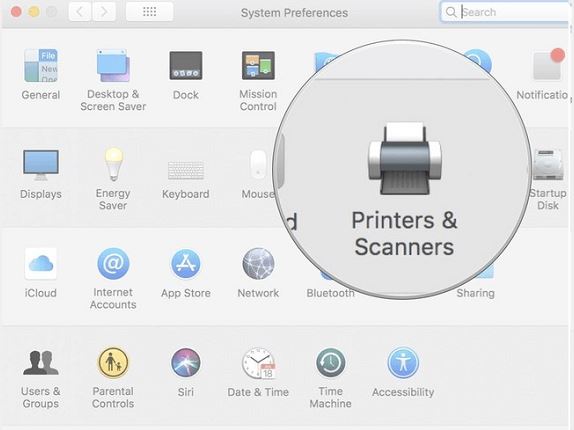
- Now, click on the “Printers and scanners” option.
- Click the “+” sign present on the bottom left corner of the screen.
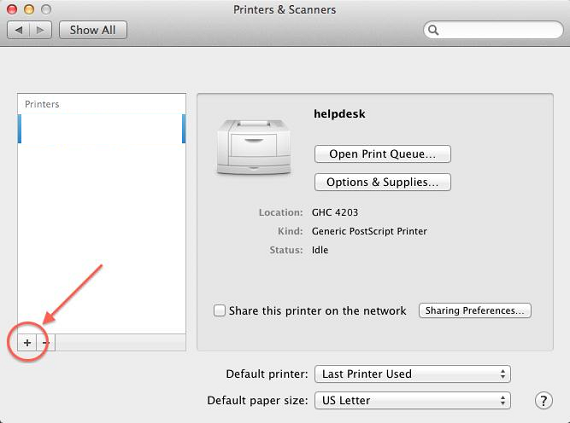
- Add your Canon printer. You can choose the printer from the drop-down list provided.
- Proceed with the onscreen instructions carefully and connect your Canon printer to the Mac system without any trouble.
We hope that the above-mentioned steps will help you to complete the Pixma mg2522 wireless setup for the Mac system. Make sure that you follow the guidelines carefully in the sequence they are provided to avoid any technical hassle in the process.
Canon Pixma MG2522 setup Chromebook: Steps To Follow
For the Canon MG2522 setup, Proceed with the step-by-step instructions mentioned below:
- Tap on the ” profile” icon.
- Tap on the WiFi logo, and you can see the Wi-Fi menu appearing on your screen.
- Make sure that your Chromebook and printer are connected to the same Wi-Fi network.
- Enter the network password to get connected, when prompted, hit the “Connect” button.
- Now, click the “Chromebook account” icon. You will see the popup menu appearing on your screen.
- Go to the Settings menu.
- Here, click on “Advanced”>> “Printer”.
- Choose the “Add a printer” option.
- Click “Select your printer”>> “Add”.
Proceed with onscreen instructions and complete the printer installation process. Users can also connect the Canon printer to the Wi-Fi network using the Canon Pixma MG2522 IP address. To know more details, you can refer to the canon printer manual and find the related information.
Also Read : Canon Pixma Mx922 Setup
Wrapping up
Canon Pixma MG2522 is an amazing Inkjet printer that allows users to print, copy, and scan documents. In order to use the printing services, you need to complete the Canon Pixma MG2522 setup for your Windows or Mac device. You can set up the printer by following the guidelines mentioned above. The given steps are easy and let you complete the setup process without any trouble. However, if you are still unable to complete the printer setup on your own, you can always contact Canon professionals for help. The printer support experts are available round the clock, so call them any time and get instant professional guidance.